How to give your garden a xmas makeover...
1. Create a daybed/or reading nook in your garden. Whenever you want a quiet moment or the weather is beautiful, you will find yourself gravitating to this spot with a book and a cup of tea whenever you can.

2. Update with new brightly coloured cushions and matching accessories to your alfresco.


3. Put in a herb garden. Planting herbs you use regularly such as mint, parsley, rosemary, basil and sage is a fantastic extension to your kitchen, and you are more likely to step outside to snip some fresh herbs for your cooking if its just a few steps away.

Photo by Jani Bryson/iStock / Getty Images
4. Liven up a dull space with a vertical garden. Can be made simply using some leftover pallets.
5. Add a tree. - For shade, fruit or simply to provide some vertical scale to the garden.

6. Paint your fence. - So often I go into gardens where the fence has been left unpainted or its a light colour. The best fence colours is a dark colour, so then the fence blends into the shadows of the planting. Opposite to interiors, a dark fence will make the garden appear bigger.

Building a Vertical Garden using a recycled pallet...
Well its been a few months since my last post. Ive been flat out, and with Easter, school holidays thrown into the mix, and a heap of new clients. I have simply been too busy to write! BUT, I have also been busy creating and building, which I also love to do.
I live in a townhouse, with very limited garden space and I struggle with the 'want', to have a beautifully designed garden and the 'need' of practical plants that provide herbs, fruit and veggies for my cooking.

My entire yard. Mess and all!
But after seeing a few inspiring pics on Pinterest, I wondered if I could make a vertical pallet garden work, with some of my favourite herbs and small veg. I have a skinny side area, where I have my clothesline, bins and air-conditioning condensers. So I thought why not give it a go.
So what do you need:
A good strong pallet - available on building sites...but check before you take them, that they are rubbish. Some companies ask for a bond and the builders don't get it back unless they return them.
Weed mat or other horticultural material, that will hold the soil.
Good quality potting mix
An assortment of irrigation fittings - if you want to have it connected to your irrigation system
Staple gun and good staples
Scissors
Plants - planted seedlings of Rocket, lettuce, thyme, climbing spinach, cat nip and cat mint (for Monkee) Strawberries, tarragon. Once it was standing I added Cherry tomatoes and Artichoke to the top!
Firstly, check your pallet for exposed nails and staples and affix any loose boards.

Monkee the cat, checking for nails and loose boards
Then staple your weed mat to the back of the front...and I put staples along each rung to hold it tighter. On this one I had it curved over the back before stapling it securely along the front boards. (In subsequent ones I doubled up the length and then looped it back after adding the soil and stapled to the back)
I also added some staples to the sides, to keep the soil from escaping.

Staple the weed mat to the inside (with pallet face down)
Then I added my irrigation. Here I have black poly pipe affixed to the outside, which connects to my irrigation system. Then I have fed 6mm Netafim drip tube at intervals, positioned at the bottom of each rung on the front so they drip over the plants.

Install the irrigation. I used a black poly feed along the side and connect strips of 6mm Netafim.
Fill the pallet with the planting mix, then staple the weed mat to the back. Make sure you use plenty of staples to stop the soil escaping.

Add potting mix, and then the back cover of weed mat. Make sure to staple well to keep the soil in.
Stand the pallet up and let the soil settle, then fill with more potting mix to the top.

Stand it up and let the potting mix settle, then add more to the top.
I added some waterproof material to the back, as its going against my house wall and I don't want it to stain. This was actually some plastic root barrier that I had in the garage. Always take every opportunity to recycle :) You could also use some plastic or blue board to seal the back.

My waterproof backing is some root barrier that I had in the garage. Blueboard would work just as well, but you will need to nail it on.
Lay it down again to add your plants. Make a little slit in the weed mat, wherever you want a plant to go. I made a little hole with my hands, and then pushed my seedlings in (very carefully).

Lay it down again and cut holes for your plants. Carefully make room in the soil with your hands and put the plants in. Leave for 2-3 weeks for the roots to establish in the soil.
Leave it on the ground and keep it well watered for a couple of weeks so that the the roots establish. Once you are happy that its all growing well, stand it up and move it into position. Don't forget to hook it up to your irrigation system.
It's also a good idea to fix it to the wall with some dynabolts (or whatever is required for the surface you are putting it against) to stop it from falling and crushing someone.
This is my pallet garden today...3 months later, under my clothesline. The plants on top grow well as they get more of the sun. The cat mint and catnip are also going great guns at the bottom. I think I just need to find some herbs that like a bit more shade.


The Rocket is massive! Need to eat more of it :) and the climbing spinach is sensational!
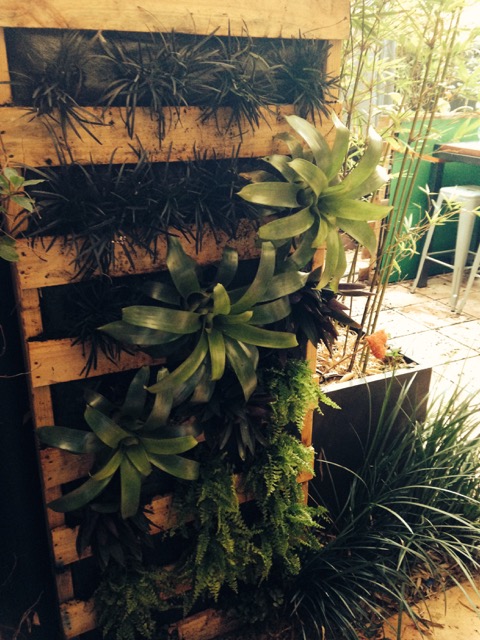
You can use all sorts of plants in your vertical garden. I had another space which was in full shade and a bit boring, so I did a taller pallet with shade plants in it. I was going to paint the pallet to be the same colour as the fence...but in the end I liked having the pallet stand out as a pallet.

Any sort of plant can be used in your vertical garden. This one hides a fence in a shady spot, so is filled with shade loving plants. Unfortunately Monkee now uses it to climb the fence and visit the neighbours!